Now, although it’s a bit late, I’d like to go through the common process of installing Custom Firmware (CFW) for the 3DS. However, when looking at various articles, they only explain specific parts, making it difficult to grasp the overall flow.
Therefore, since it’s challenging to understand the sequence when undertaking modifications, it takes time to comprehend.
With that in mind, I’ll create an article covering everything from step 1 to 100 in one go.
Translation:
By the way, as for why I’m doing such a thing now… The reason is, when I actually tried to do it, I got confused because there are various methods for installing CFW, and due to articles on various methods, there is scattered information everywhere without any consistency, and I don’t even know which one is the correct one to implement.
In other words, it’s a state of “not knowing what I don’t know”!!
So, I hope to unravel each step as much as possible, including explanations of the apps to be installed, and modify it after understanding.
Needless to say, please make decisions at your own risk whether to implement it or not.
Version of the subject (3DS) this time:
Azarashi This time, the old FW (firmware) initial model 3DS lying around at home will be used for the experiment.
FW version: 10.7.0.32J
You might think, “Isn’t it the latest FW?” But by chance, it was lying around with the old FW, so the truth is that I don’t want to bother going through the trouble of updating to the latest FW just to install CFW. w I will try installing CFW from the latest FW when I write the next article.
Supplementary information!
There is a recently released model called NEW 3DS for the 3DS. Depending on whether it’s the initial model 3DS (just 3DS) or NEW 3DS, the steps may vary slightly, so please check what you have in advance.
The terms will be converted as follows:
・ 3DS⇨OLD ・ NEW 3DS ⇨NEW
Available CFW versions with the procedure this time:
Azarashi By the way, the versions of 3DS FW that can be installed with the procedure I introduced this time are as follows.
■ Installable FW versions 9... J to 11..*.*J
Required tools:
Azarashi I won’t introduce the obvious 3DS main unit and PC.
The only thing you really need is a large-capacity SD card.
Prepare a larger size because you will need to transfer it to the PC every time you extract a game.
・ Large-capacity SD card (at least 32GB, preferably 64GB)
Links:
Azarashi Also, as follows (roughly)
・ SD card reader Not necessary if your PC has a card reader.
・ 3DS main unit (either OLD or NEW)
Explanation of apps and terms to be installed:
Azarashi Here, I will explain the apps and tools needed to install CFW.
Knowing what you are doing when installing them will make a big difference in how you handle them.
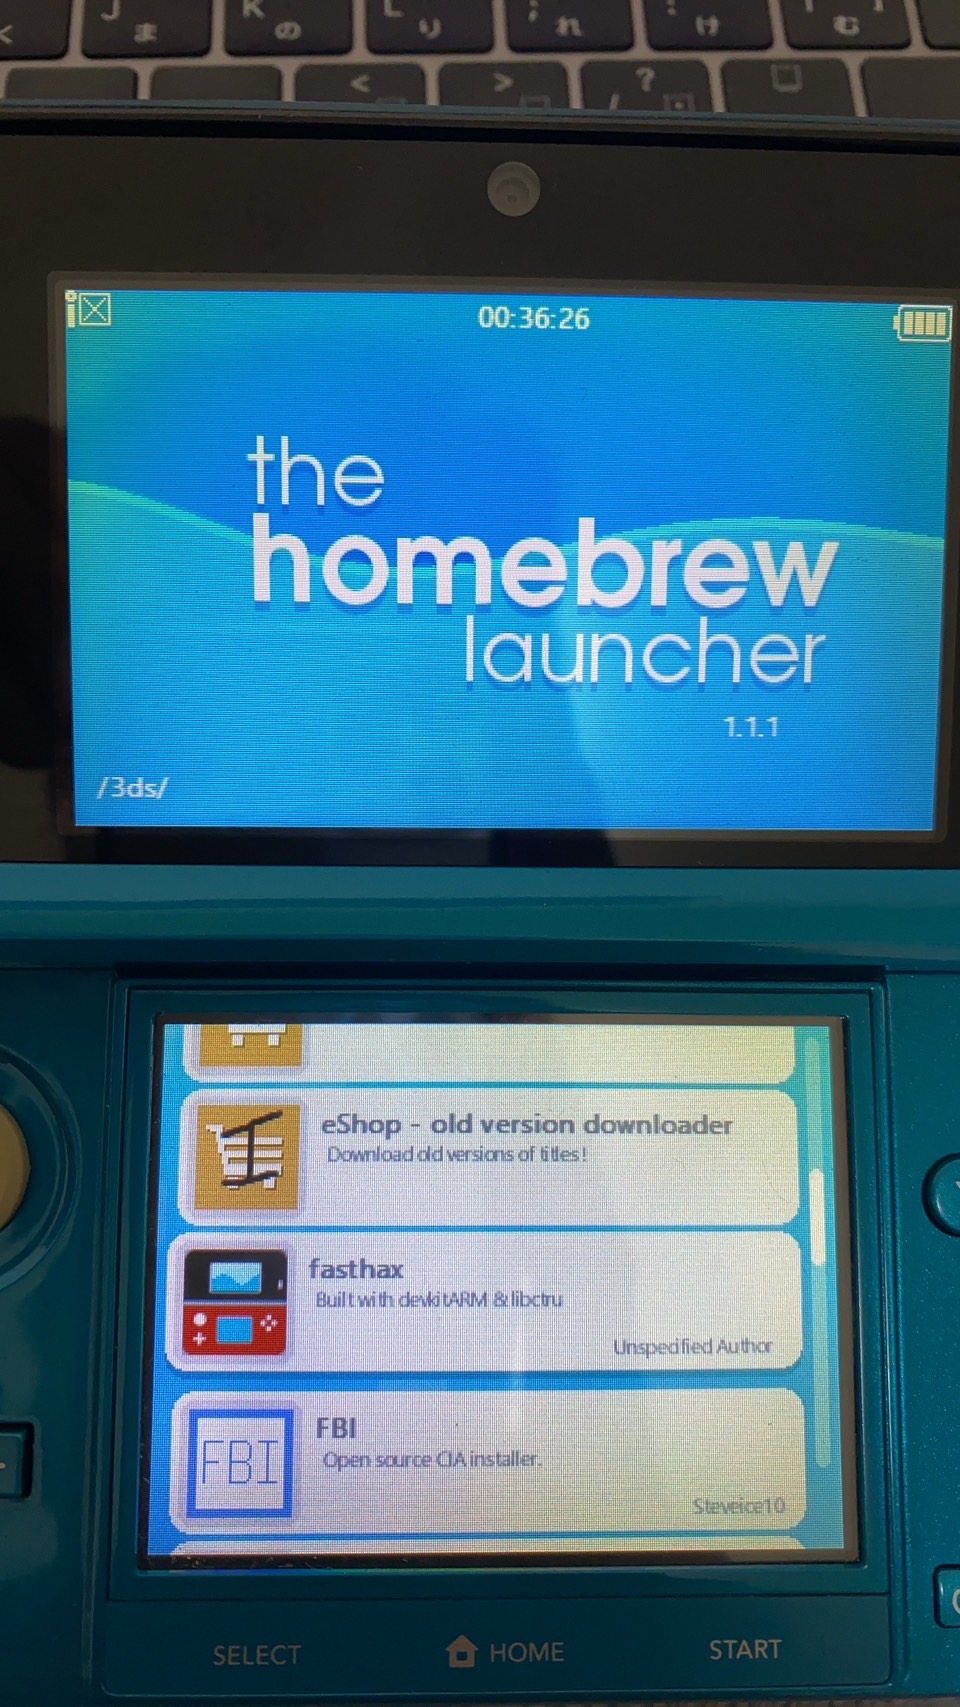
Homebrew Launcher: Necessary to run homemade apps on the 3DS. fasthax: A feature that allows you to install homemade apps on the 3DS. safehax: A feature to downgrade the 3DS FW. In other words, it’s going back to the time when there were many vulnerabilities, exploiting those vulnerabilities to install CFW. CIA (CTR Importable Archive): The file extension when installing the game itself on the 3DS main unit (SD card). In other words, when playing downloadable games without a game cartridge, Nintendo is executing files with this extension in the background. Luma3DS CFW: The main tool for CFW installation. Hourglass9: A tool that can access all files in the Nintendo 3DS file system. FBI: A tool to install games extracted in CIA format on the 3DS main unit or execute apps when installing homemade apps. SafeA9LHInstaller: Tool for installing and managing A9LH (Arm9LoaderHax).
Preparation Step 1:
Azarashi First, let’s make sure not to get caught by Nintendo when installing CFW. lol
- Disable “SpotPass” communication:
Open “System Settings” from the lower screen of the 3DS, navigate as follows:
[System Settings] >> [Internet Settings] >> [SpotPass] >> [Send System Information] Change “Send” to “Do not send.”
- Make Friend List private:
Open the “Friend List” from the lower screen of the 3DS, navigate as follows:
[Friend Notification Settings] >> [Settings] >> [Friend Notification Settings] >> [Show what you’re playing?] Change “Show” to “Do not show.”
Preparation Step 2:
- Download the setup tool:
1-1. Go to this link (A9LH SetUpPack – 4) and download the tool.
1-2. Click on [DOWNLOAD (3.22GB)] to start the download.
1-3. Once the download is complete, unzip the ZIP file.
- Download the Homebrew installation tool:
2-1. Go to this link (The Homebrew Launcher – 3DS) and download the tool.
2-2. Find the item on the screen below, select the FW version of your 3DS, and download the tool.
- [OLD / NEW]-[number].[number].[number]-[number][E / J] to match the FW version of your 3DS
- Click “Download otherapp” (Note: It takes a long time for the download to start)
To check your 3DS’s FW version, open “System Settings,” and it will be displayed at the bottom right of the upper screen as “ver ..*-** J.” This is the FW version currently applied to the 3DS.
2-3. Rename the downloaded file to otherapp.bin.
- Combine the downloaded files:
3-1. Confirm that there are “New3ds” and “Old3ds” folders in the unzipped “A9LH SetUpPack – 4.”
- Use either one, depending on whether your 3DS is New or not. This time, we’ll use the OLD side.
3-2. Confirm that “Old3ds” has “SETP01: Copy SD” and “SETP02: Copy SD,” and copy the downloaded otherapp.bin file to the “SETP01: Copy SD” folder.
- At this point, there is already another otherapp.bin in the folder, but go ahead and overwrite it.
3-3. Remove the SD card from the 3DS and connect it to the PC.
- If you haven’t inserted the SD card into the 3DS at all, you won’t be able to use it, so insert a new SD card and format it for the 3DS.
3-4. Copy all the contents of “SETP01: Copy SD” to the SD card.
- The “SETP01: Copy SD” folder itself is not needed, so do not put it in the SD card.
Installation Procedure
Thank you for your preparation efforts.
Now, let’s go through the actual steps to install CFW. I’ll explain the overall flow first.
The process involves the following steps: “Launch Homebrew” → “3DS Hacking” → “Install CFW” → “Set up CFW to boot permanently.”
Understanding this sequence will make it easier to grasp what you’re doing at each stage.
Launch Homebrew
- Insert the SD card back into the 3DS after connecting it to the PC and start the game.
- Launch “Nintendo 3DS Sound” once the game is running.
- Once “Nintendo 3DS Sound” is open, wait for the SD card to be read.
- After the SD card is loaded, navigate through the SD card’s music by selecting “SD Card” → “3 nedwill 2016.” The screen will turn black, and eventually, the “homebrew” will launch.
3DS Hacking
- Execute “fasthax”
1.1. In the “homebrew” menu, scroll down and launch “fasthax.”
1.2. When it starts, the upper screen will darken, and English text will appear. Once you see “succeeded,” press the “Start” button.
- Execute “safehax”
2.1. Return to “homebrew” and scroll down to launch “safehax.”
2.2. After launching, “Decrypt9” will start. Follow these steps:
mathematicaCopy code
[SysNAND Options] → [CTRNAND Transfer…] → [Auto CTRNAND Transfer] Enter the following commands: Left, Up, Right, Up
2.3. When prompted to select a file, choose “2.1.0-4J_ctrtransfer_o3ds.bin.”
2.4. After a successful downgrade, press “Left” and “Start” simultaneously to shut down.
2.5. Start the 3DS without the SD card.
- Execute “P6hLhx”
3.1. Launch the internet browser and insert the SD card.
3.2. Enter the URL “https://goo.gl/P6hLhx” in Google.
3.3. SafeA9LHInstaller will start. Press “SELECT” to initiate the full installation.
3.4. After installation, press any key (e.g., A) to shut down.
Install CFW
- Execute “Luma3DS”
1.1. Boot by pressing [SELECT + Power]. Luma3DS will start.
1.2. In Luma3DS, check the following options:
sqlCopy code
✅ Autoboot SysNAND ✅ Use SysNAND FIRM if booting with R ✅ Show NAND or user string in System Settings ✅ Show GBA boot screen in patched AGB_FIRM
1.3. Press “START” to save the settings and shut down by pressing any key (e.g., A).
- Execute “Hourglass9” (First Time)
2.1. Boot by pressing [START + Power]. Hourglass9 will start.
2.2. Navigate to [SysNAND Backup/Restore…] → [SysNAND Restore (keep a9lh)].
2.3. Select “NANDmin.bin” and proceed.
2.4. After success, press “← + Start” to shut down.
- Execute “Godmode9” (First Time)
3.1. Boot by pressing [→ + Power]. Godmode9 will start.
3.2. Navigate to [SDCARD] → [files9].
3.3. Execute “2.1.0-4J_ctrtransfer_o3ds.bin” and delete it.
3.4. Press [R+START] to shut down.
- Execute “Hourglass9” (Second Time – Install FBI)
4.1. Boot by pressing [START + Power]. Hourglass9 will start.
4.2. Navigate to [SysNAND Backup/Restore…] → [Health&Safety Dump].
4.3. Inject “fbi_2.4.2_injectable.app” into “Health&Safety.”
4.4. After success, restart by pressing [START].
- Execute “FBI”
5.1. After restarting, launch “FBI.”
5.2. Navigate to [SD] → [CIA] and install the necessary CIA files.
5.3. After installation, shut down the 3DS without opening the present.
- Execute “Hourglass9” (Third Time)
6.1. Boot by pressing [START + Power]. Hourglass9 will start.
6.2. Navigate to [SysNAND Backup/Restore…] → [Health&Safety Inject].
6.3. Inject “hs.app” into “Health&Safety.”
6.4. After success, press [← + Start] to shut down.
- Replace SD Card Programs
7.1. Remove the SD card from the 3DS and connect it to the PC.
7.2. Open the “STEP02” folder from the downloaded “A9LH SetUpPack.”
7.3. In the “STEP02” folder, change “Luma” to “luma” (lowercase L).
7.4. Copy the “luma” folder to the SD card, overwriting existing files.
- Execute “SafeA9LHInstaller”
8.1. Insert the SD card into the 3DS and boot by pressing [↓ + Power]. SafeA9LHInstaller will start.
8.2. Press [SELECT].
8.3. After success, press any button (e.g., A) to shut down.
- Execute “Godmode9” (Second Time)
9.1. Boot by pressing [→ + Power]. Godmode9 will start.
9.2. Copy “arm9loaderhax.bin” from [SDCARD] to [SYSNAND CTRNAND].
9.3. Unlock SysNAND when prompted in English.
9.4. After entering “Left, Up, Right, Up, A,” press [R+START] to shut down.
Set Up CFW to Boot Permanently
- Boot the 3DS without the SD card.
- When Luma3DS starts, check [Show NAND or user string in System Settings].
- Press [START] and restart the 3DS.
This completes all the steps. Setting up CFW to boot permanently allows you to launch CFW without an SD card, so make sure to follow through to the end.
Confirmation of CFW Installation
To confirm whether CFW has been installed:
Open the system settings and check the bottom right of the upper screen.
For the original firmware, it would show “Ver ..*.J.” With CFW, it should change to “Sys ...*J.”
If all the steps were completed successfully, you should see this change even with the SD card removed.
Game Backup Methods
Note: There are differences in capabilities between 3DS and DS, so understanding these distinctions is crucial.
- Full Backup (Applicable to 3DS/DS Cartridges)
1.1. Press [START + Power] to launch Hourglass9.
1.2. Select “Gamecart Dumper…”
1.3. Choose “Dump Cart (full)” to start the game backup process (takes approximately 20-30 minutes).
⇨ After completion, press [Start] to reboot.
- CIA Backup (Applicable to 3DS Cartridges; DS Cartridges Not Supported)
2.1. Press [START + Power] to launch Hourglass9.
2.2. Select “Gamecart Dumper…”
2.3. Choose “Dump Cart to CIA” to start the game backup process (takes approximately 20-30 minutes).
⇨ After completion, press [Start] to reboot.
- Storage Location for Backed-Up Games
Backed-up games are saved under the SD card’s [files9] folder. File names typically follow the format of the game’s serial number with an extension.
Launching Games
There are approximately three methods to launch games:
- To Launch 3DS Games
For 3DS games, you can install and play them on the 3DS using the CIA files extracted from the cartridges.
Refer to the following article for detailed instructions: [Link to article].
- To Launch DS Games
DS games cannot be installed like CIA files, so an additional step is needed. Install “TWiLight Menu++ Rocket Robz” for this purpose.
Refer to the following article for detailed instructions: [Link to article].
- To Launch Other Games
3.1. Using “TWiLight Menu++ Rocket Robz”
Besides DS games, you can launch other games using this method. The launching process is similar to DS games.
Note: Super Famicom games may not work well with this emulator, so a separate emulator is recommended.
Games Supported: GB, GBA, GBC, NES, SNES (English version), Sega GameGear, MegaDrive.
3.2. To Launch Super Famicom Games
Install “Snes9x” to launch Super Famicom games.
Refer to the following article for detailed instructions: [Link to article].

コメント